Showing posts with label food ♥. Show all posts

21 Days in 2015

1.19.2015


Writing this post has been rolling through my mind a lot lately.  It is something that I wrestled with sharing, but at this point, the secret is pretty much out, and I would love to write it in order to help people better understand intensions and answer a lot of questions that we've received.

Starting January 5 Dane and I began the Daniel Fast together.  The Daniel Fast is a 21 day fast based off of the fast Daniel did in the Bible.  I am not going to go into a lot of detail about the specifics,   there are many other websites and books available that can explain it much better than I (like this).


But just to give you the basics: for 21 days, Dane and I committed to eating fruits, vegetables, whole grains, nuts, water, spices.  We don't indulge in meat, dairy, sugars or chemicals.  It is not a diet, it is not something we are doing to lose weight, it is not a detox and it is not a cleanse (although all of those things have happened).  Here's what it is: a spiritual journey, helping us turn our hearts and focus to God for strength, direction and wisdom.  Relying on Him and His word (not food) to support  & sustain us emotionally and physically.

Back in December, Dane and I began talking about what we would like to see happen in our lives in 2015.  The list is kind of personal, so I'm not going to share it here, but we knew in order to see those things happen, it was not going to be on our strength.  We also wanted to make sure our list was not driven by us, but that it was God's will and desire for our lives.  So we decided to set aside some days at the beginning of 2015 to really focus on these things in prayer.

And here we are, 15 days in, 6 days left, and am here to say I am so pumped we have done this together.  Here are few surprises that have happened along the way:


- The first few days were awful.  I have never had such persistent headaches.  Coming off a serious sugar, caffeine and chemical addiction was a lot harder than I thought.  I knew there would be a bit of this, but I didn't realize how much my body was addicted to these three things.

- God's Word is sweeter.  Seeking Him with very specific things in mind has been so good.  When scripture says that the Word of God is living and active...well I couldn't agree more.

- It has strengthened our marriage, opening up communication about our prayer life, scripture & personal struggles.

- We are pretty creative in the kitchen and cook at home a lot!  Bonus, you save a lot of money when you don't eat out or pick up a soda at the gas station several times throughout the week.

- Fruit really can taste like candy.

- Discipline is something rare in our world today.  The looks on people's faces when we tell them why we can't go out to eat or why we don't want anything to drink but water is pretty interesting.  What's more interesting is the look you get when it is realized that you don't want to cheat...even though they promise they won't tell anyone.


- It is not a sprint, it is a marathon.  21 days is a lot longer than I thought.  I figured I would blink and this would be over but it hasn't been quick and painless, but slow with growing pains. The growing pains are worth it.

- Tofu is in the refrigerator section by the fruits and vegetables.  Knowledge that is helpful if you ever decide to try this out yourself. (I could spend an entire blog post on my first time shopping for tofu).

- It does get easier as you go.  In fact, you begin to forget what life was like before the Daniel Fast.

I think overall we are both so excited we have went/are going on this journey.  I feel like we have set ourselves up for a win in 2015.  I feel like we have had a lot of clarity and have heard God's voice several times during this.  And yes, I am really excited for next Monday morning, when Dane gets off work and we sit down to a plate of bacon, eggs & pancakes and debrief the entire experience as well as lift of prayers of thanksgiving for all of the goodness God has shown us!


So there ya go, that's what Dane and I have been up to lately.  Hopefully that answers some questions and maybe even encourages you to try something new out yourself!

It's Hot Out There!

8.20.2014

August has set in folks!  To be honest, it hasn't been that hot this summer.  I don't know if we've broke into the triple digits yet, and for that I am thankful, but today was close.  And when it is that hot, it is important to stay hydrated.  Here at our house we've been trying to keep it interesting by experimenting with infused waters.  We've always been a fan of the standard lemon + cucumber + mint water, but we decided to mix it up a bit and see what we came up with.  

Orange + Ginger
I had never experimented with ginger until moving to Australia, and all of my housemates cooked with it.  I came to love the flavor it added to foods and thought it would be fun to try in water.  This water was super refreshing and energizing.  Ginger is great for the immune system and orange provides natural energy!  So if you're feeling a little drained in the middle of the day, try reaching for this instead of a can of cola.  


Grapefruit + Rosemary
So we have been doing different infused waters to share whenever we have dinner guests over.  It has been a really fun conversation piece, and I'm a sucker for a good conversation starter.  I knew this combination would be a risk, but thought why not.  The results?  Well Dane and our dinner guests loved it, and I didn't care for it.  I felt the grapefruit was way too overpowering, and this is coming from a girl who loves grapefruit.  Everyone who loved it told me they normally don't eat grapefruit but found this drink very refreshing.
 Blueberry + Mint
This drink was created because I liked the colors.  When you add the blueberries they float around a bit, almost like a a lava lamp.  Sadly, the blueberries never really infused so the only flavor I really tasted was mint.  The blueberries were fun to eat though.  They exploded kind of like bubble tea tapioca balls.


Strawberry + Basil

Overall, I would say this has been our favorite one.  It doesn't take that many strawberries to get a fantastic sweet flavor in the drink and the basil adds an unexpected twist.  Make sure to drink this water within the day because the strawberries get kind of gross if they are in there longer than that.  I love how this drink turns a fun shade of pink...the perfect baby shower beverage right?

Now it is your turn!  Get a jug, jar, pitcher, and start infusing!  I would love to know what you try and how it turns out!

A Lovely Breakfast

2.12.2014


One of our favourite things to cook together is breakfast.  Dane is real familiar with the breakfast fry pan because he grew up flipping pancakes and eggs in his family's cafe.  One morning we woke up craving pancakes and realized we don't have any milk to make them, but we did have a container of greek yogurt.  We figured, why not, and took to the internet to find the perfect greek yogurt pancake recipe.  Ever since that day there has been no turning back.  And we are here to share it with you today.  

What I love about this recipe is that it is four simple ingredients.


(the perfect serving for two)
1 1/2 cups greek yogurt
2 eggs
1 cup flour
2 tsp baking powder

Simply mix all the ingredients in a bowl and cook your pancakes on a hot skillet.  


Since we were having a little Pre-Valentine celebration we decided to make our pancakes in the shape of hearts.  I think most of you know how to do this, but just in case you don't, simply take a metal cookie cutter, spray it with cooking spray and fill it with your pancake batter.  Your pancakes will hold whatever shape the cookie cutter is.  

 We also had another minor pancake emergency one morning.  We were out of maple syrup and lets be honest, although true maple syrup is the best, it doesn't always fit into the budget.  We found that some bottles of maple syrup in Australia would set us back about $15.  This was $15 too much for us, so I took a cooking tip out of my mama's recipe box and learned how to make my own maple syrup on a budget.  Making your own syrups are very simple, its equal parts sugar, water, and then add the secret ingredient.  What's maple syrups secret ingredient?  Imitation Maple Extract.  This will set you back about $2 and you can make SEVERAL batches of syrup with it.


Maple Syrup on a Budget
2 cups water
2 cups sugar
1 tsp maple extract

Simmer the 2 cups water and 2 cups sugar on a stove top for about 15 minutes.  Then stir in the 1 teaspoon of maple extract and pour into your syrup jar.


We sat down to a delicious pancake breakfast.  Topped with strawberries, blueberries, dark chocolate, syrup and whipped cream.  Maybe you could make this lovely breakfast for your special Valentine?  Speaking of Valentines Day, just wanted to express our love to each of you.  We are so thankful to have amazing readers who are always sending us positive comments and encouragement.  Please know that you are dearly loved and treasured.  ♥   D+C

That's Amore

2.05.2014


I love making homemade pizza!  You can get super creative with it and I don't think I've ever met anyone who doesn't love it.  Plus when you make it at home it can be as healthy or as hearty as you like.  

Tonight, with the help of Brittany, we made a man pizza and a lady pizza.  Man meaning lots of meat and cheese.  Lady meaning more creative and gourmet  Truth be told, we enjoyed it all.  So lets get started.  

First off the crust.  I love to make my own crust.  I use a French bread recipe that belongs to my mama. This recipe uses dry yeast.  I find that this ingredient often scares people, but it doesn't need to.  

Mom's French Bread
(make enough for 2 pizzas)
3 cups hot water
1/3 cup sugar
1/3 cup stick margarine
2 tsp salt

¼ cup warm water
2 packages yeast

8 cups flour

1. Combine water, sugar, margarine and salt.  Let cool until luke warm. 
2. Dissolve the 2 packages of yeast in warm water.
3. Add yeast to water sugar, salt and margarine mixture.
4. Mix in flour slowly and knead for 5 minutes.
  5. Let rise for 1 hour, punching down every 15 minutes.  
6. After one hour roll out dough in a jelly roll pan for pizza crust

If the steps above make you nervous, then homemade pizza can still be an option for you.  There are some great pre-made pizza crusts at the grocery store.  Dane has also been known to use hamburger buns and create mini pizzas (thank you 4-H demonstrations).  

Now select your toppings.  One thing I love about homemade pizza is that it is a great way to use up leftover ingredients in your fridge and cupboards. Plus it can be as simple or epicure as you want to make it.
For our "man" pizza we knew we wanted to use lots of meat and cheese.  We had some browned sausage mince on hand, pepperoni, and bacon.  For sauce we used spaghetti sauce and lots of mozzarella cheese.  We also had some extra cheese chunks from another meal so we decided to make stuffed crust.  Stuffed crust is super simple to make and is oh so delicious.  Simply take a cheese chunk and pull the dough over the top and seal (picture below).    To finish off this pizza we rubbed the crust with garlic butter.  

And our "lady" pizza was inspired by chicken fajitas.  As a base we used cream cheese.  Seriously cream cheese is one of the best bases of a pizza and something you must try!  We topped it with canned chicken (keeping it simple), grilled onions, grilled peppers, cherry tomatoes, avocado, feta cheese and cilantro  Before putting the pizza in the oven, drizzle the top with fresh squeezed lemon juice and a bit of olive oil.

Cook both pizzas at 350 degrees for about 30 minutes or until the crust is starting to brown.  

Our pizzas were a huge hit with both the men and the ladies.  We couldn't believe how much we loved the chicken pizza, it was a complete experiment and have decided its a keeper.  We would love to hear what pizza topping combinations you love.  Arrivederci!  D+C

Super Bowl Food from Australia

1.29.2014

It has been two years since we have watched a Super Bowl on US soil.  I can't even tell you how excited we are about this.  One thing Australia did teach us is how to make an amazing appetizer that would be a hit at any Super Bowl Party, Sausage Rolls.  I must say thank you to my lovely friend and housemate Sarah Anne for the sausage roll lessons.  Now, here we go.


Sausage Rolls
1 tsp olive oil
1 onion finely chopped
1 pound ground sausage
1 cup breadcrumbs
2 TB tomato sauce (the Australian word for ketchup)
Salt and Pepper to taste
1 egg beaten
3 puff pastry sheets thawed

1. Preheat oven to 400 F.  Heat olive oil on stovetop and then brown onions.

2. Now combine the browned onions, pound of sausage (yes raw....I know it shocked me too), breadcrumbs, tomato sauce, a little salt and pepper and egg in a bowl to create the sausage roll filling.

3. Cut pastry sheets in half.  Divide filling into 6 equal portions, form a sausage down the center of the pastry sheet.

4. Roll pastry and sausage into a tube.  Cut rolls about 1 ½ inches thick.  Place on the tray seam side down.  To help with browning, I like to splash a little milk on the top.  Then bake 20 minutes or until golden brown.


Serve the sausage rolls with tomato or bbq sauce.

I hope you'll try this Aussie treat out  at your Super Bowl Party this Sunday (or Monday morning if you're in Australia).  Speaking of Super Bowl, who are you cheering for?  I'm going to have to say....the Chiefs.  Maybe next year right?  So if I have to chose, you'll find me cheering on the Seahawks this weekend.  Yes, I know my Seattle friends are proud!  Happy Super Bowl Weekend Everyone!  D+C

Divine Divinity

12.17.2013


One of the best Christmas traditions is to  make Christmas candy with my mama.  We get out the kitchen aid mixer, the flour, the baking pans, the butter, lots of lots of sugar, and we create quite the culinary delights, from homemade caramels to sugar cookies.  But divinity has become one of my favourites.  We have been making divinity for about 5 years now and this year we finally perfected it.


I first tried divinity at my neighbor Kathy's house.  I was over helping her make Rosettes (another fancy Christmas cookie), and she asked if I would like to try her divinity.  I was blown away.  It was deliciously soft, sweet, and moist, almost like a marshmallow, but so much better.  Immediately I called my mama and said, we have to try this.  Mom knew all about divinity.  Her mom used to make it and would beat it all by hand, which once you see the recipe you will understand why that is a big deal.  Kathy told me that there were lots of little secrets to making the perfectly moist divinity so mom and I went to her house for lessons.

 Now if you're up to the challenge, I hope you will try your hand at this yummy Christmas delight.

Divinity

4 cups sugar
1 cup corn syrup
¾ cup water

Place these three ingredients in a sauce pan over low heat.  Stir until sugar is dissolved. Then continue cooking without stirring until the liquid reaches 255 degrees (use a candy thermometer to measure). 

While cooking the mixture, beat ½ cup egg whites until they are stiff. 
1/2 c egg whites equal about 3 eggs.  A little tip here, use eggs that are room temperature.  I don't know why, but it seems to affect things.  

Once the mixture on the stove has reached 255 degrees, slowly pour the hot mixture into the egg whites and beat consistently until mixture holds its shape and loses its gloss.  This is the most difficult and important part.  Too much beating and the candy will become tough and crumbly, too little and you have a gooey mess.  Just right and you have the best dang Christmas candy on the block, this is unless Kathy lives on your block.  Mom and I measured the time and we found for us that 14 minutes 30 seconds is about perfect.  

Now that you've reached the perfect texture add 1 tsp vanilla and mix for a few short seconds.  

At this point you can get very creative with the flavours of your divinity.  Mom and I like to add 3/4 cup chopped black walnuts (if you're into the whole nut scene).  Kathy creates fruity flavours by adding packets of Kool-Aid.  Yes you read that correctly, Kool-Aid.  She adds lime to create a key lime pie affect or raspberry for a nice berry flavour.  Or you can just leave it plain.  All are amazing, and all are delicious.  

After flavoured, spread it into a greased pan 9x9 pan.  Once firm cute into one inch square to serve.    

One more tip, make sure you keep in an air tight container, and most importantly, get ready for a sugar rush!


If you try making divinity I would love to hear how it went!  Would also love to hear about some of your favourite Christmas creations in the kitchen.  Happy Baking!

Autumn Apples

4.30.2013


Yesterday I shared about our super fun ladies night!  Of course you can't have an amazing gals night without amazing food.  Since it is Autumn here in Australia, I decided to make some of my favourite Autumn dishes including apple crisp and apple cider.  

Here's the problem.  I struggled to find the ingredients I would normally use in order to make both of these dishes (story of my life here in the land down under), so I made up the two recipes and they turned out pretty fabulous.  I would love to share the recipes with ya!


Spiced Apple Cider
3 liters apple cider
3 cups orange juice
3 cinnamon sticks
12 whole cloves
1/2 cup brown sugar
1 tsp cinnamon
1/2 a lemon sliced.

Super simple!  Just combine all the ingredients in a stock pot on the stove and head until boiling.  Then shut off and put the lid on the top.  Let it set for a couple hours so all of the flavors can be absorbed.  Then, when ready to serve, simply turn back on the burner briefly.  

I love making this dish, because the whole house smells incredible!

I don't know about you, but I have a really bad habit of buying a bag of apples and eating all but one or two, which then those one or two seem to become lost somewhere in the fridge.  After a couple weeks of this, I find I have about 5 apples lying around in my fridge, all different types, textures, and tart levels.  That's when I usually make some sort of apple crisp.  It is a great way to use up a lot of those apples, even some that may have been rolling around in the fridge a bit too long and have lost that perfect crisp level.  


Caramel Apple Crisp
(the caramel apple filling)
5 apples peeled and diced
1/2 cup butter
3 tablespoons flour
1/2 cup white sugar
1/2 cup brown sugar
1/4 cup water

(the oatmeal crisp)
1/2 cup butter melted
1 cup flour
1 cup white sugar
1 cup oats
1 tablespoon cinnamon

(the extra buttery topping)
1/4 cup butter melted
1 tablespoon cinnamon

Being by making the caramel apple filling
1. Melt 1/2 cup butter in a pot on the stove and then whisk in the 3 tablespoons of flour to create a paste.  
2. Now add the 1/2 cup white sugar, 1/2 cup brown sugar and 1/4 cup water.  Stir.
3.  Add the diced and peeled apples and let simmer for 5 minutes stirring constantly.
4. Pour into a greased 9x13 pan.

Next make the oatmeal crisp topping.  
1. Simply combine 1/2 cup melted butter, 1 cup flour, 1 cup white sugar, 1 cup oats, and 1 tablespoon cinnamon.  The mixture will be course.
2. Sprinkle over the caramel apple pie filling in the 9x13 pan.  

Finally, add the extra butter topping.
1. Drizzle the 1/4 cup melted butter over the top of the crisp
2. Sprinkle the top with the 1 tablespoon cinnamon.

Bake on 350 for 45 minutes.  Best served warm and with ice cream (of course).

I can't believe I didn't snag a final pic of this dish.  It turned out so well, we just gobbled it up.  woops.

Mmmm, so much applelicious goodness!  I hope you will enjoy these two recipes!   Christy

Food ♥: Sushi

11.03.2012


Sushi is one of Dane and my favorite treats when we go out, but we thought it might be fun to try and create it at home.  It was super intimidating at first, but we have had much success, so we thought we would share a few of our at home sushi secrets with you.

First you must gather your sushi inspiration (this is one of the best parts).  When we went out for sushi we would pay attention to the ingredients in the rolls that we loved and make mental notes.  We love any roll with avocado, sweet potato, cream cheese, chicken, crab or cucumber, so we have based most of our at home rolls off of these ingredients.  


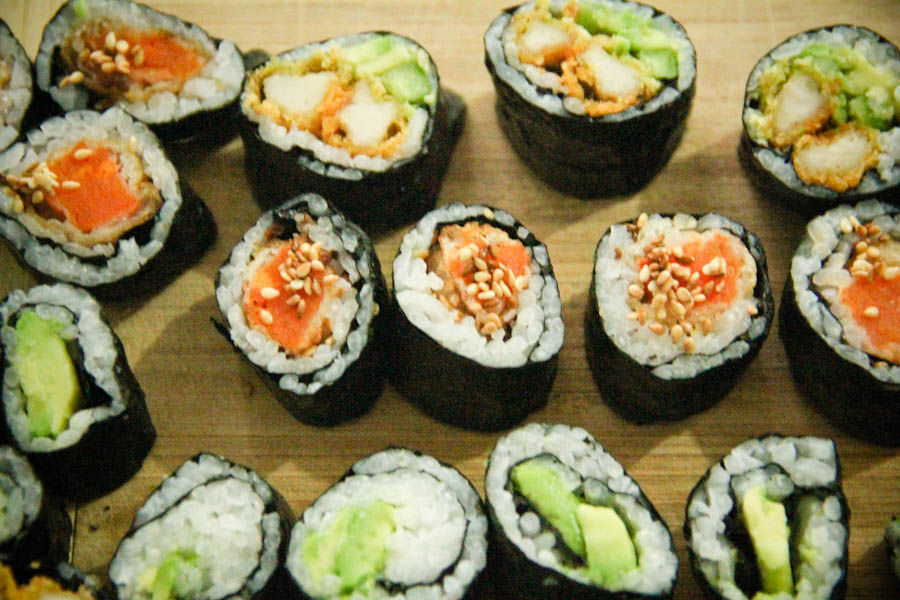
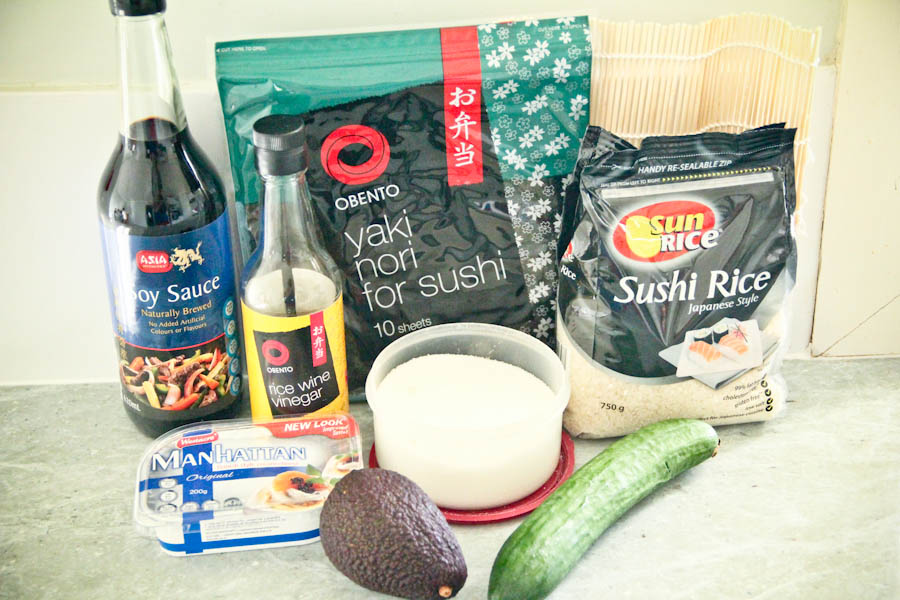
Collect your ingredients.  For every sushi roll we make we use a sheet of yaki nori, which is dried sea weed and sushi rice.  You will also need to collect whatever ingredients you would like in your sushi that meal.  Tonight we have chosen avocado, cucumber, cream cheese, sesame seeds, breaded chicken fingers (can use thin chicken strips) and soy sauce for dipping.  You will also need rice wine vinegar and sugar as part of your sushi rice recipe.


Making your sushi rice.  First off, be sure you buy sushi rice.  I can't emphasize this enough because it makes all the difference in the world.  Simply follow the recipe on the bag.  It is really simple to make.  We actually do ours in a rice cooker, because it is easier, but the stove top directions work fine as well.  Then stir in 1 TB of sugar and 1 TB of rice vinegar to the rice.  Recipes always say not to do this in a metal bowl.  I don't know what kind of crazy science experiment this might create, but I take their advice and grab a glass bowl for the mixing.  After it is stirred in, let the rice cool.  


While your rice is cooking, prepare your sushi fillings. 

Cucumbers: peal, remove the seeds and slice into small thin strips. 

Avocados: remove the pit, slice the avocado, and pull out of the peal.

Cream Cheese: remove from fridge so it can soften a bit for easy spreading.

Chicken Fingers:  bake in the oven following the package directions.  We average about 3 chicken fingers per chicken roll.


Sesame Seeds: place in a small skillet on your oven burner, cook on medium, stirring constantly until they are nicely toasted.  As they cook they will release a very nice nutty flavor.  Dane does this part for me.  He's really good at it.  


Just had to add this picture because as I was preparing dinner tonight, I peaked out the window to see my husband hand washing our table cloth for the dinner tonight.  I am a blessed woman.


Now it is sushi making time.  Here are the four roll varieties we are making tonight.  

Roll Number One: Avocado + Cream Cheese + Cucumber 

Roll Number Two: Chicken + Cucumber + Avocado

Roll Number Three: Tempura Battered Sweet Potato + Sesame Seeds  (we have not perfected this roll yet, so I am not going to give you instructions on it just yet).

Roll Number Four: Avocado, yep that is it, and I LOVE it!


Place your yaki nori on a sushi mat.  You don't have to have a sushi mat, but it is helpful in the process and they are really affordable.  We bought ours for $1.50 (and that is in Australia folks).  There is a shiny side and a dull side.  Place shiny side down.  


Next add a thin layer of cooled sushi rice.  Some tips here.  Sushi rice is super sticky.  Dip your spoon and hands in water to keep it from sticking.  Yes I spread the rice with my hands.  They are the best tools I have in the kitchen.  Another tip.  Make this layer thin.  Often you can get carried away with the rice layer which makes your sushi rolls way too fat.  The rice is yum, but there is a lot more flavor to be added to this bad boy.  


Add your ingredients to one end of the paper.  We do each ingredient in a row.  So a row of avocado, a row of cucumber and a row of cream cheese spread.  


Now begin rolling.  As you roll use the sushi mat to pull the roll tight.  The stickiness of the rice will help it stick.


When you get to the end of the roll, simply dip your fingers in some water and moisten the paper.  The paper will become sticky like an envelope, and then seal it shut.  Now allow your roll to rest about 10 minutes, and then cut it into your desired width.  


We line all of our sushi pieces on a cutting board for serving.  To serve we use chopsticks and jar lids to hold our soy sauce, nothing like an upcycle project huh?  

This is such a fun dinner to do because you can experiment and fit it to your liking.  It is also a really fun meal to have with friends.  So I hope you will give sushi at home a try.  

Happy Eating,
The Kids Down Under

This post is dedicated to Brock & Brittany, the newest sushi addicts in our lives.